

First steps
Everything in the app hangs off one screen. Once you can read it, the rest follows.
The home screen
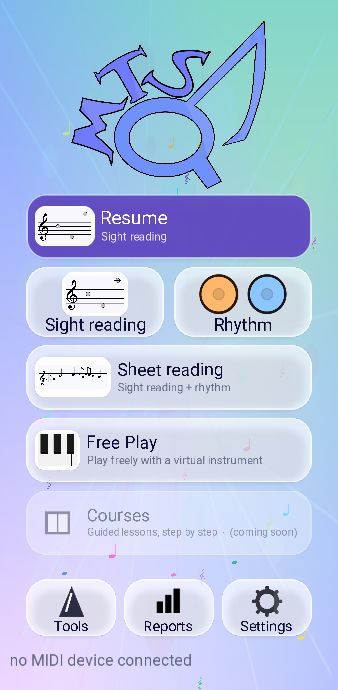
The two things you will use most sit side by side in the middle, and the card above them is a shortcut back to whatever you were last doing.
 1
2
3
4
5
6
7
8
9
1
2
3
4
5
6
7
8
9
- Your level and your points. The same total is used everywhere in the app. Where the points come from.
- Resume — reopens the last mode you practised, with the settings it had. Its subtitle tells you what you are about to reopen: Rhythm · 4/4 · 80 BPM. On a fresh install it reads Start and takes you to sight reading.
- Sight reading — a note appears, you play it. Pitch only, no tempo. See the page.
- Rhythm — two drums and a moving playhead. Timing only, no pitch. See the page.
- Sheet reading — the two of them together, which is what reading music actually is. See the page.
- Free Play — a keyboard with no exercise attached. Tabs above it add drum pads, an arpeggiator and slots to record into. See the page.
- Courses & exercises — the guided lessons, the scored exercises, Adventure, and Other modes for the ones you have unlocked.
- Tools, Shop, Settings — the metronome, the note detector, the writing tools and your Reports; the shop; and the app settings. See the page.
- The MIDI line. It reads no MIDI device connected until you plug in an instrument, then names it.
How a session works
All three training screens are built the same way, so learning one teaches you the other two.
- A green tick and a red cross count your answers. The tick only moves on a note you got right first time.
- A timer runs at the top right. In Rhythm it can be a countdown that ends the session on its own; the length is one of the options.
- A gear opens that mode’s options. Every mode has its own, and they are remembered between sessions.
- The back arrow returns to the home screen. Your score is written to the statistics when the session ends.
Connecting a digital piano
The app reads a real instrument over USB. On a phone that means a USB-OTG adapter: the cable that turns the charging port into a host port, with the piano’s USB cable plugged into it.
- Plug the piano into the phone through the OTG adapter, and turn the piano on.
- Android will usually ask which app should handle the device. Allow MT Sound Quest.
- Open the app. The line at the bottom of the home screen changes from no MIDI device connected to the name of your instrument.
- Play. The on-screen keyboard stays available — the two work side by side, and either one answers.
The sustain pedal comes through as well, on the standard MIDI controller, so a held chord stays held. Nothing needs configuring: the app follows whatever the instrument sends.
When the cable comes out of the wrong side
The OTG adapter — or the charging cable, if you practise plugged in — sticks out of the bottom of the phone, which is exactly where the phone wants to sit on a stand. Standing it the other way up puts the app upside down.
Turn on Settings › Upside-down screen and the whole display rotates 180 degrees, controls included. You can then rest the phone on the cable side and keep reading the right way up.
If the line still says no MIDI device connected, the usual culprit is the cable. A plain charging cable will not do it — the adapter has to be a real OTG one, and some phones want the piano powered on before it is plugged in.
Playing without a piano
The keyboard drawn at the bottom of the screen is the default answer method, and it is enough for everything the app asks of you. In sight reading and sheet music reading, Sustain holds the sound after you lift your finger, and the slider beside it sets the volume.
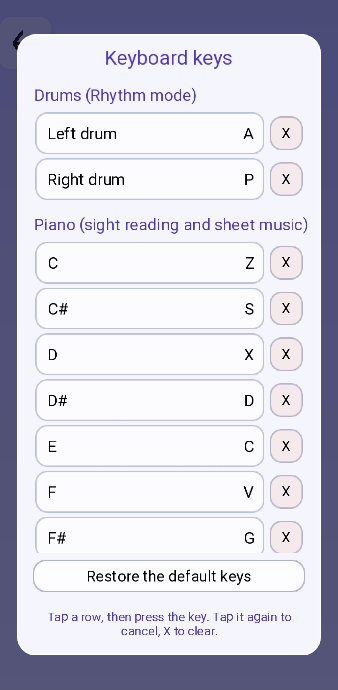
If you attach a physical keyboard — a Bluetooth one, or the desktop build — the keys are listed under Settings › Keyboard keys and can be reassigned one by one. Out of the box the two drums are A and P, and the twelve piano keys start at Z for C.
Where your progress lives
Everything stays on the device. Sessions are written to the statistics as they end, and Tools › Reports shows them per mode. If you would rather not record a session — you are trying something out, or handing the phone to someone else — each training mode has a switch for it in its options, and the run is thrown away at the end.
There is no account and nothing to sign in to. Uninstalling the app removes the history with it, so if you have written rhythms or scores you want to keep, copy them out first with the Copy rhythm and Copy the score buttons in each writing tool.